When installing large-format tiles, such as 24×24-inch tiles, the choice of the trowel is crucial for achieving a secure, even, and long-lasting bond between the tile and the substrate. Choosing the right trowel ensures that the adhesive is applied correctly, reduces the risk of air pockets or uneven surfaces, and helps prevent tiles from shifting or becoming loose over time. So, what trowel should you use for 24×24 tiles? Let’s break down the key considerations to help you make an informed decision.
Why the Right Trowel Matters
Tiles as large as 24×24 inches require an adequate amount of thin-set mortar to support the weight and ensure a strong bond. The right trowel not only helps with the application of mortar but also ensures that the mortar is spread evenly across the surface. If the mortar coverage is insufficient, the tiles may not adhere properly, leading to cracks, uneven grout lines, or tiles that shift over time. Using the wrong trowel can also result in excessive mortar, which may ooze out from under the tile, causing unnecessary mess and waste.
Key Considerations for Choosing a Trowel
When selecting the right trowel for 24×24 tiles, there are several factors to consider:
-
Size of the Tile: Larger tiles, such as 24×24-inch tiles, require more adhesive to ensure full coverage. The trowel’s size and notch pattern should be selected to match the size of the tile for optimum coverage.
-
Type of Thin-Set Mortar: The type of mortar used—whether it’s a standard thin-set, a modified mortar, or a specialty adhesive—will also influence the trowel size. Some mortars are thicker than others, and some require a larger notched trowel for proper spreading.
-
Substrate Type: The surface to which the tiles are being applied also plays a role in choosing the right trowel. For example, a smooth surface may require a smaller notch, while an uneven surface may require a larger notch to accommodate the additional mortar needed to fill any gaps.
The Best Trowel Size for 24×24 Tiles
For 24×24-inch tiles, a 1/2-inch by 1/2-inch square-notch trowel is typically recommended. This size allows for adequate mortar coverage and ensures that enough adhesive is applied to support the large tiles. The square-notch pattern provides a good balance between coverage and the right amount of mortar for a secure bond. However, in some cases, you may need a slightly larger trowel.
1. 1/2-inch by 1/2-inch Square-Notch Trowel
- Ideal for: Most installations with large-format tiles like 24×24 inches.
- Why it works: The 1/2-inch square-notch trowel is capable of providing sufficient coverage for the back of a large tile, ensuring that the mortar fills the gaps beneath the tile without wasting too much material.
2. 1/4-inch by 3/8-inch or 3/8-inch by 3/8-inch Square-Notch Trowel
- Ideal for: Slightly smaller tiles (but can work for 24×24 tiles in specific conditions).
- Why it works: If you are installing tiles with a more textured surface or a rough substrate, a slightly smaller notch may be more appropriate to control the mortar flow. However, it may not be as effective for 24×24 tiles as the 1/2-inch notch.
Trowel Notch Pattern
The notch pattern on the trowel is just as important as the size. For 24×24 tiles, a square-notch pattern is generally preferred. This type of notch provides the best coverage for larger tiles, ensuring that the adhesive is applied evenly across the tile.
Why square-notch trowels work well for large tiles:
- Square-notch trowels create evenly spaced ridges of mortar that provide consistent support when the tile is pressed into place.
- The ridges help prevent air pockets from forming underneath the tile, which can cause uneven adhesion and lead to tile movement.
- Square notches allow the adhesive to spread more evenly, which is critical for large-format tiles that need to stay level and properly aligned.
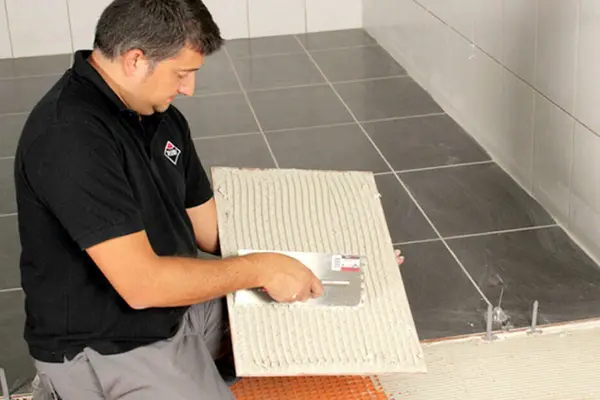
How to Use the Trowel for 24×24 Tiles
Once you’ve selected the right trowel, the technique for applying the mortar is just as important:
-
Apply Mortar to the Surface: Use the flat side of the trowel to spread the mortar across the substrate. Make sure to cover the area where you plan to place your first tile.
-
Notch the Mortar: Hold the trowel at a 45-degree angle to the surface and use the notched edge to create even ridges of mortar. The depth of the ridges should be consistent across the surface.
-
Press the Tile into Place: After applying the mortar, press the 24×24 tile firmly into the adhesive, slightly twisting the tile as you press it down to ensure full coverage. Make sure the tile is level and properly aligned with other tiles.
-
Check for Mortar Coverage: After placing the tile, lift it slightly to check the coverage of the mortar. The back of the tile should have full coverage, with no bare spots. If coverage is insufficient, you may need a larger trowel.
Additional Tips
-
Use a Mortar Comb: When using large tiles, it can be helpful to use a mortar comb to help spread the mortar evenly. This tool can help to distribute the adhesive more evenly, especially when dealing with extra-thick mortars.
-
Back Buttering: For particularly large tiles (like 24×24 inches), some installers choose to “back butter” the tile by applying a thin layer of mortar directly to the back of the tile before setting it. This ensures maximum coverage and strengthens the bond.
Conclusion
Selecting the right trowel for 24×24 tiles is key to ensuring a successful tile installation. A 1/2-inch by 1/2-inch square-notch trowel is typically the best choice, as it provides the ideal balance between coverage and consistency. However, depending on the type of mortar, substrate, and specific installation conditions, a slightly smaller or larger trowel may be needed. Remember, the goal is to ensure full adhesive coverage and a strong bond, so always check the tile’s adhesion after setting it and make adjustments if necessary.
By using the right trowel and following proper installation techniques, you can ensure that your large-format tiles stay in place for years to come, adding beauty and durability to your space.
Post time: 2月-14-2025